Azure is amazing, but it’s hard to know in advance what’s going to be charged. And when you start to start a business, you try to spend as little money as possible !
What’s free on Azure ?
12 month free plan for most services, good option when your project is quite ready to be deployed, but you may have to pay some fees !
40 services free always, we will use this option because we like when it’s always free 😃
Check section “**Azure services that are free always” **here to get a list of all free services
Ready ? Let’s go
We will start to prepare your Azure environment and then, develop a small .Net application with a Database.
Setup Azure environment
Go to Azure portal https://portal.azure.com/
Prerequisite : setup a subscription if you don’t have one. It’s free if you use free Ressources.
Create an App Service Plan, which will host your Applications
Tips : never work with IP address. Use a DNS, IP address can change later if you decide to change your plan
ℹ️ : Choose a resource name related to your final architecture, it’s not easy to rename afterwards
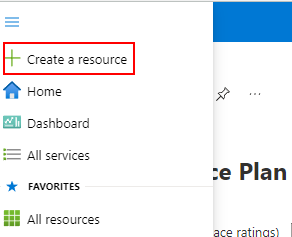
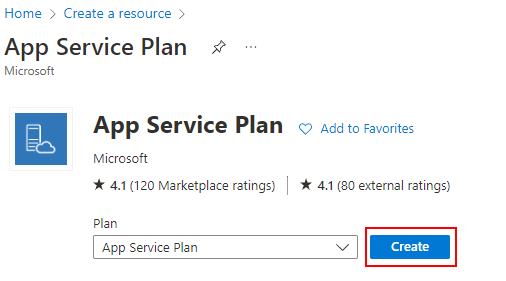
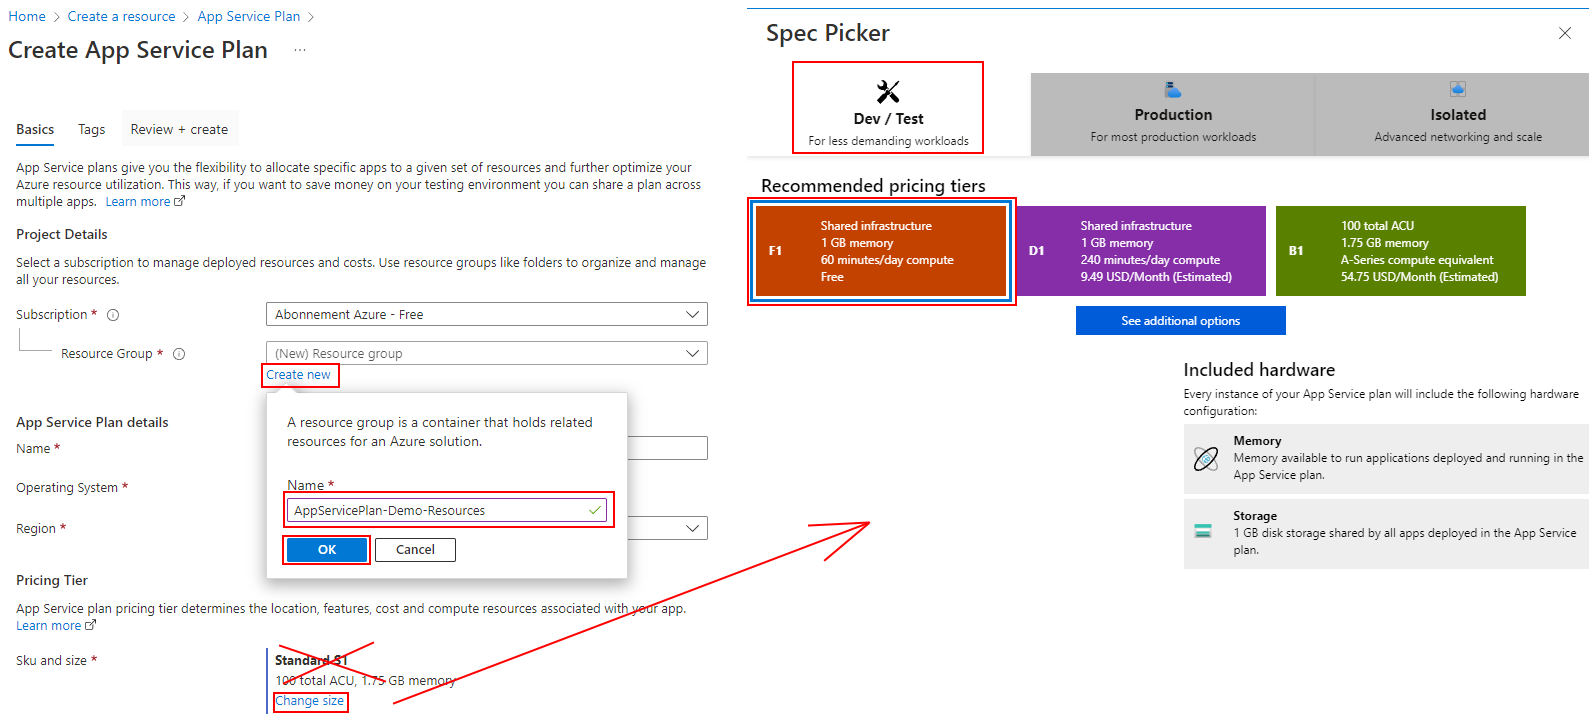
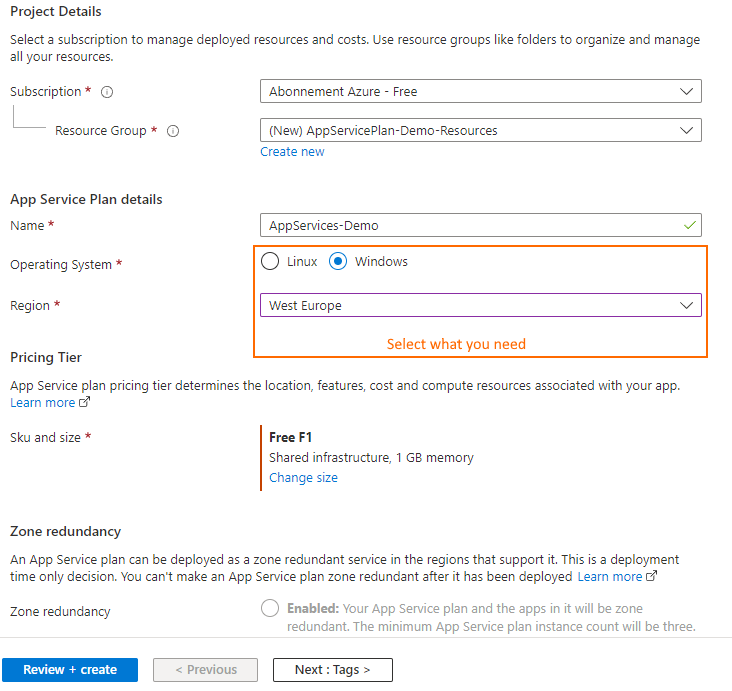
Your app service plan is ready ! 🚀
- Create your first App Service
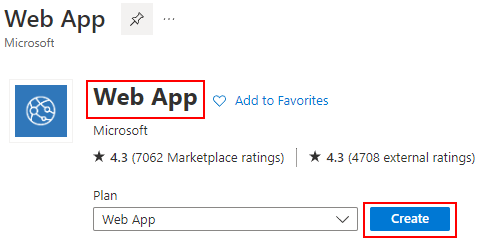
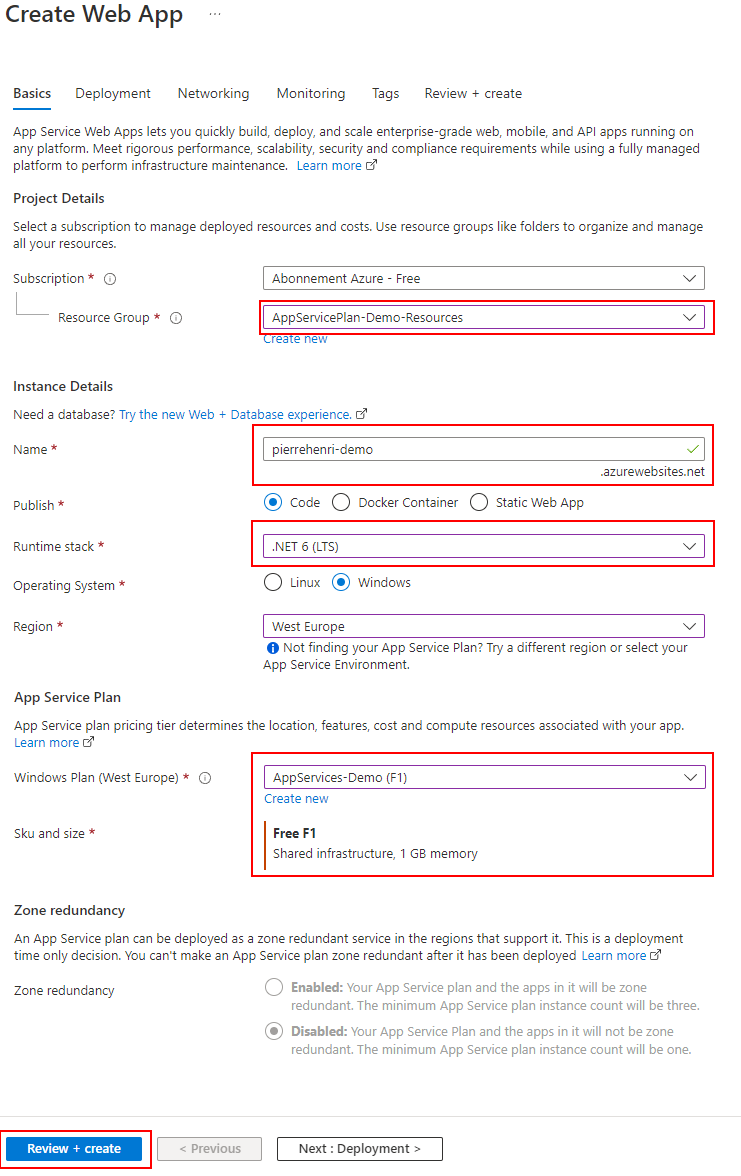
Your Web App is ready ! 🚀
- Create your database plan
For our purpose, we will use an Azure Cosmos DB service, it is the only database free service for the moment. Cosmos DB is Microsoft’s latest NoSQL database. You will be able to move to SQL server later if your business require a powerful database.
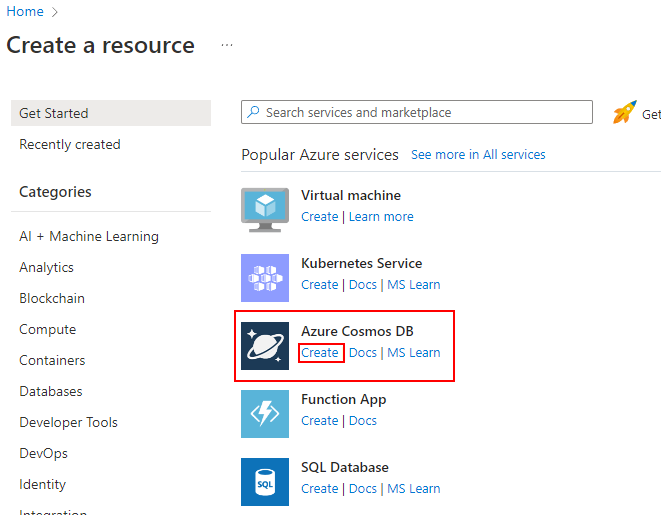
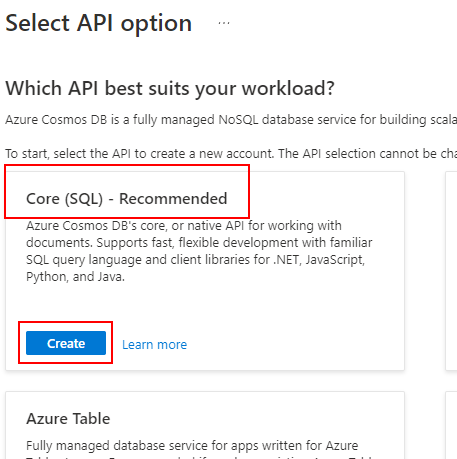
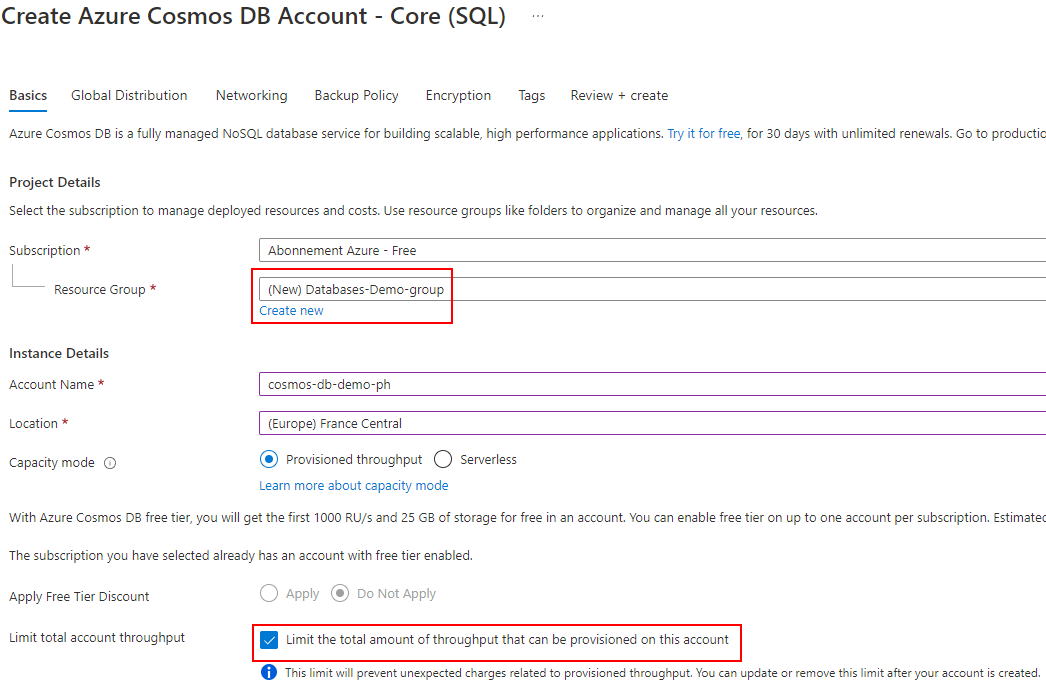
- Create a DataBase and a new container from the QuickStart Menu
Go to DataExplorer section, then “New container”
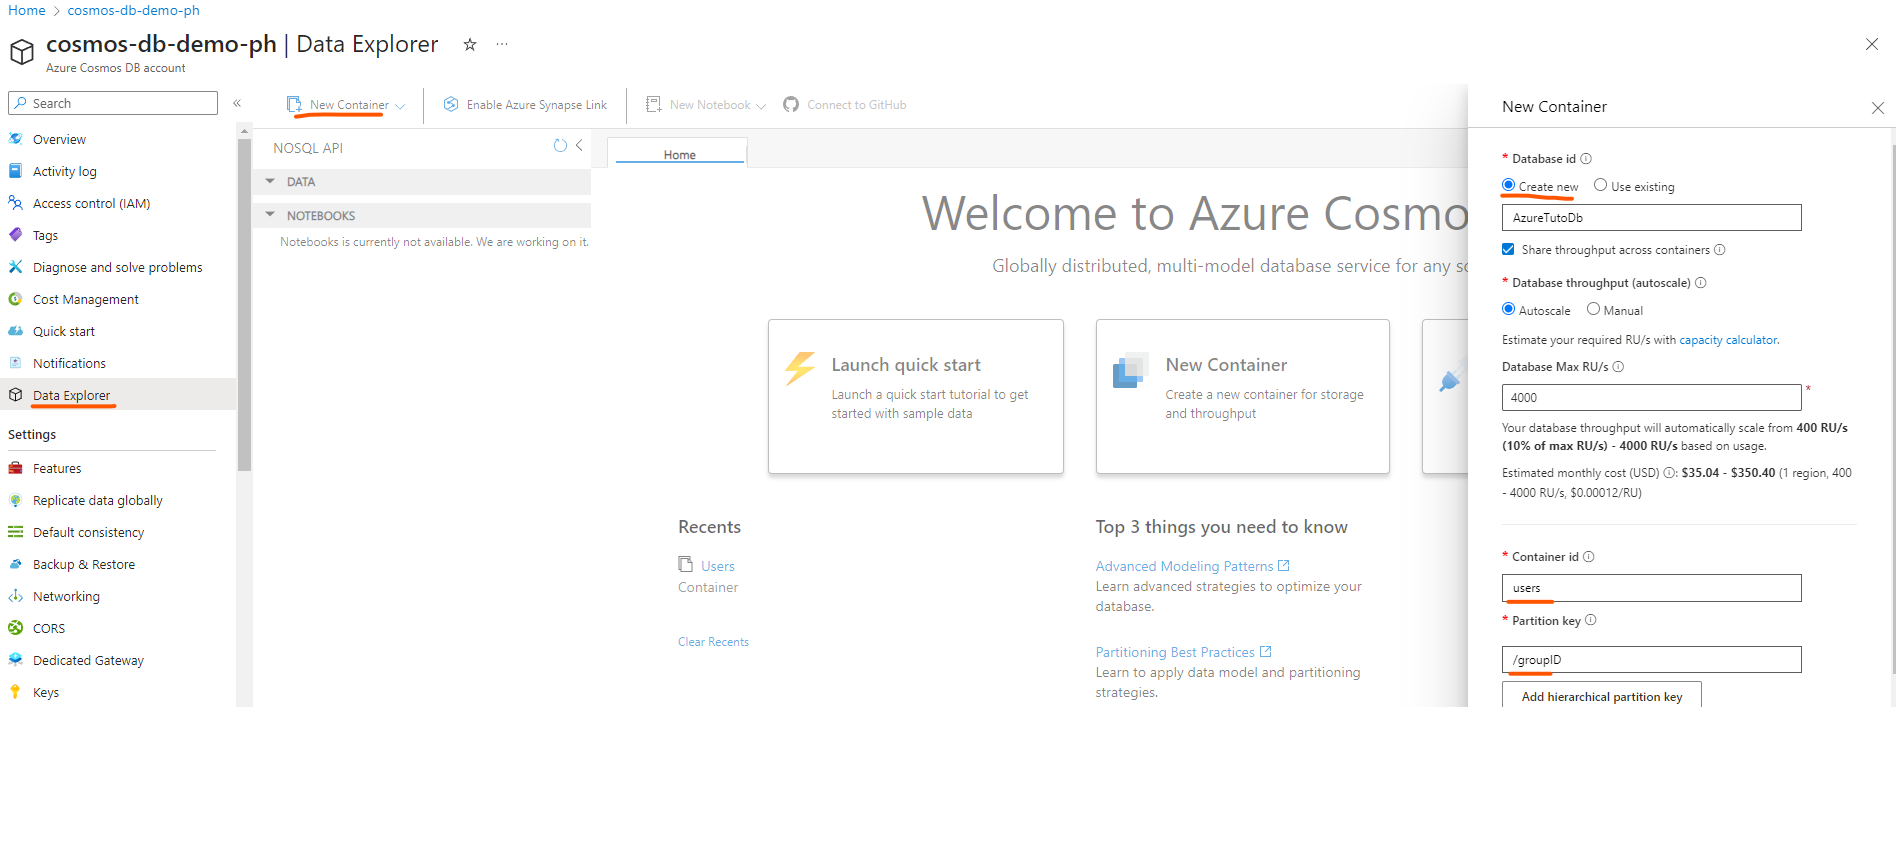
Your Cosmos DB is ready ! 🚀
It’s time to start coding 🎉😀
Develop a simple .Net application
In this part we are going to develop a very simple application, who store and retrieve a user, feel free to develop your own 😃
In this example, we are going to use Blazor (because I’m a big fan 😃 )
- Open Visual Studio (Or any IDE, and create a new Blazor Server App)
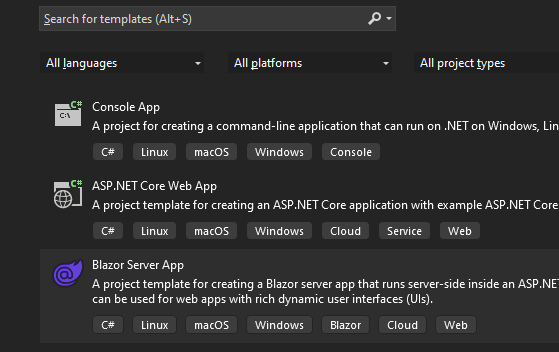
Select a name and click Next
Select latest .Net LTS (.Net 7 today) and click Create
Entity Framework is not as good as basic CosmosDB client, but it’s perfect for the goal of this project. If your business grows, you can easily migrate to SQL server without any changes.
Install Nuget Package
dotnet add package Microsoft.EntityFrameworkCore.Cosmos
- Configure your settings to access to the database from appsettings.json
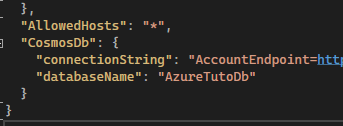
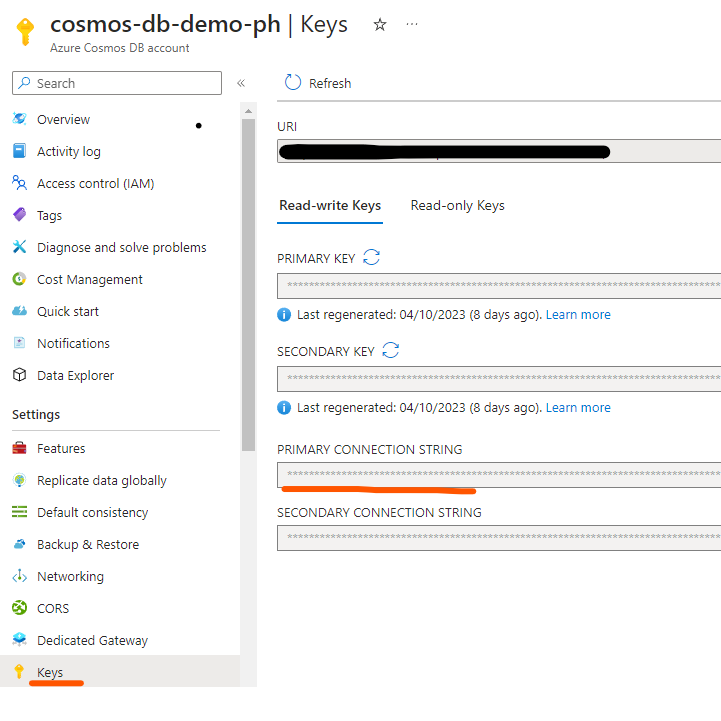
To get your connectionString ⇒ Azure>CosmosDb>Keys
Edit your program.cs in order to use EF Core with CosmosDb
// Add services to the container. builder.Services.AddRazorPages(); builder.Services.AddServerSideBlazor(); builder.Services.AddSingleton
(); builder.Services.AddDbContext
(options ⇒ options.UseCosmos( connectionString: builder.Configuration["CosmosDb:connectionString"], databaseName: builder.Configuration["CosmosDb:databaseName"])); var app = builder.Build();
Create your model — Right click on the project / Add / New folder “Models” and new class User
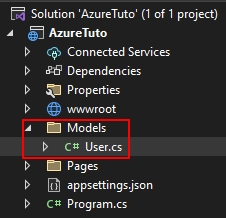
Add 3 properties to the User’s class
namespace AzureTuto.CosmosDb.Models;
public class User { public Guid Id { get; set; } = Guid.NewGuid();
  public string Username { get; set; } = string.Empty;

  public DateTime LastModified { get; set; } = DateTime.UtcNow;

  public Guid GroupID { get; set; }
}
Create the Data folder with the DbContext Class
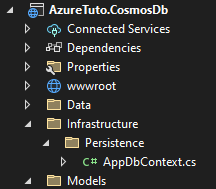
using AzureTuto.CosmosDb.Models;
using Microsoft.EntityFrameworkCore;

namespace AzureTuto.CosmosDb.Infrastructure.Persistence;

public class AppDbContext : DbContext
{
    public AppDbContext(DbContextOptions<AppDbContext> options)
       : base(options)
    {
    }

    public DbSet<User> Users => Set<User>();

    protected override void OnModelCreating(ModelBuilder builder)
    {
        base.OnModelCreating(builder);

        builder.Entity<User>(f =>
        {
            f.ToContainer("users");
            f.Property(f => f.Id).ToJsonProperty("id");
            f.Property(f => f.Username).ToJsonProperty("username");
            f.Property(f => f.GroupID).ToJsonProperty("groupID");
            f.Property(f => f.LastModified).ToJsonProperty("lastModified");
            f.HasNoDiscriminator();
            f.HasDefaultTimeToLive(60 * 60 * 24 * 30);
            f.HasPartitionKey(p => p.GroupID);
            f.HasKey(vote => vote.Id);
        });
    }
}
Create the User Service, for Crud operation. ℹ️ In Real Life, you must use interfaces and dependency injection to access them.
using AzureTuto.CosmosDb.Infrastructure.Persistence; using AzureTuto.CosmosDb.Models; using Microsoft.EntityFrameworkCore;
namespace AzureTuto.CosmosDb.Data;
public class UserService { private readonly AppDbContext _dbContext;
  public UserService(AppDbContext dbContext)
  {
      _dbContext = dbContext;
  }

  public async Task<List<User>> GetUserstAsync()
  {
      return await _dbContext.Users.ToListAsync();
  }

  public async Task<User> AddUserAsync(User entity)
  {
      var newUser = _dbContext.Users.Add(entity);
      await _dbContext.SaveChangesAsync();

      return newUser.Entity;
  }

  public async Task DeleteUserAsync(Guid userId)
  {
      var user = _dbContext.Users.Find(userId);
      if (user is not null)
      {
          _dbContext.Users.Remove(user);
          await _dbContext.SaveChangesAsync();
      }
  }
}
Register this service from Program.cs
builder.Services.AddServerSideBlazor(); builder.Services.AddSingleton
(); builder.Services.AddScoped (); // HERE builder.Services.AddDbContext
(options ⇒ options.UseCosmos( connectionString: builder.Configuration["CosmosDb:connectionString"], databaseName: builder.Configuration["CosmosDb:databaseName"])); var app = builder.Build();
. Last development : the user interface 😃 . Add a new page named Users.razor
@page "/users"
@using AzureTuto.CosmosDb.Data;
@using AzureTuto.CosmosDb.Models;
@inject UserService UserService

<h1>Users</h1>

@if (users == null)
{
    <div class="text-center">
        <div class="spinner-border text-success" role="status">
            <span class="visually-hidden">Loading...</span>
        </div>
    </div>
}
else
{
    <table class="table">
        <thead>
            <tr>
                <th>Id</th>
                <th>Username</th>
                <th>GroupID</th>
                <th>LastModified</th>
                <th>Delete</th>
            </tr>
        </thead>
        <tbody>
            @foreach (var user in users)
            {
                <tr>
                    <td>@user.Id</td>
                    <td>@user.Username</td>
                    <td>@user.GroupID</td>
                    <td>@user.LastModified</td>
                    <td style="cursor:pointer; color:#FF2819"> <span @onclick="(()=>DeleteUser(user.Id))" class="oi oi-trash" aria-hidden="true">Remove</span></td>
                </tr>
            }
        </tbody>
    </table>

    @if (!users.Any())
    {
        <p>No users found</p>
    }
}

<hr />

<h3>Add user</h3>

<EditForm OnValidSubmit="AddUser" Model="model">
    <div class="mb-3 row">
        <label for="username" class="col-sm-3 col-form-label text-end text-end-no-mobile">Username*</label>
        <div class="col-sm-8">
            <InputText class="form-control" id="username" aria-describedby="usernameHelp" required @bind-Value=@model.Username />
        </div>
        <div class="col-sm-1 error-asterix">
            <ValidationMessage For="() => model.Username" />
        </div>
    </div>
    <div class="mb-3 row">
        <label for="group" class="col-sm-3 col-form-label text-end text-end-no-mobile">Group*</label>
        <div class="col-sm-8">
            <select class="form-control" @bind="@model.GroupID">
                <option value="48c02462-46ac-4989-8de6-1ccb673a3a9f">Group 1</option>
                <option value="7940551f-3747-4a14-b293-1685bee37ac7">Group 2</option>
            </select>
        </div>
    </div>

    <div class="mb-3 text-center">
        <button type="submit" id="save" name="save" class="btn btn-primary">Add</button>
    </div>
</EditForm>

@code {

    private List<User>? users;

    private User model = new User()
        {
            GroupID = Guid.Parse("48c02462-46ac-4989-8de6-1ccb673a3a9f")
        };

    protected override async Task OnInitializedAsync()
    {
        await LoadUsers();
    }

    private async Task AddUser()
    {
        await UserService.AddUserAsync(model);
        model.Id = Guid.NewGuid();
        await LoadUsers();
    }

    private async Task DeleteUser(Guid userId)
    {
        await UserService.DeleteUserAsync(userId);
        await LoadUsers();
    }

    private async Task LoadUsers()
    {
        users = await UserService.GetUserstAsync();
    }
}
. Update the navigation menu, NavMenu.razor
 <div class="nav-item px-3">
     <NavLink class="nav-link" href="users">
         <span class="oi oi-people" aria-hidden="true"></span> Users
     </NavLink>
 </div>

The source code of this project is available on my **GitHub **: https://github.com/phnogues/AzureTuto.CosmosDb
How to publish my code to Azure ?
Simple deployment from GitHub (Ask me if you want more info on How to deply on Azure from Gitlab or Azure Devops)
From Deployment Center :
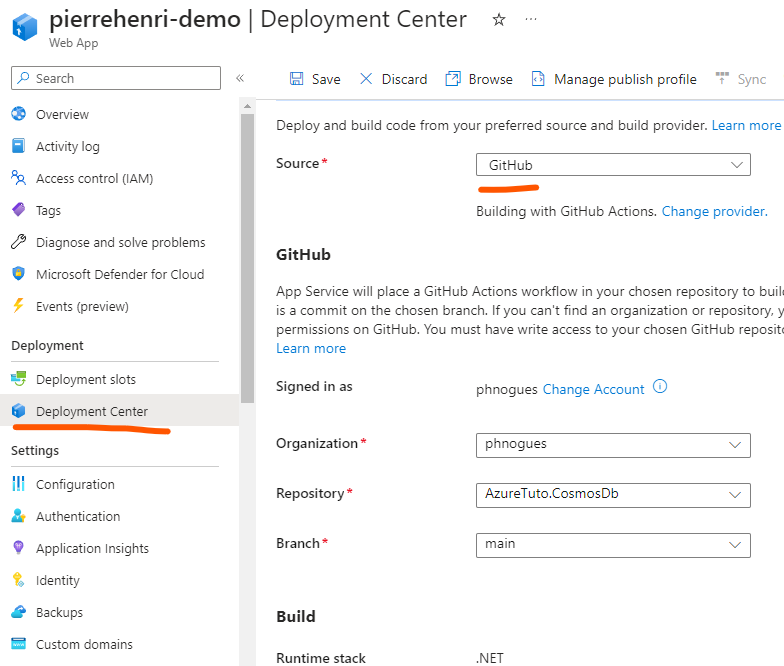
Click on Save, a github action will be created automatically.
Waits for the workflow to complete and that’s all ! Your application runs from Azure !
Run your application : Go to the overview tab

👏🚀Congrats, you have developed a full project, store in Azure Cloud for FREE and deployed from a free GitHub account.
My application is Ready to Go To Market, What’s next ?
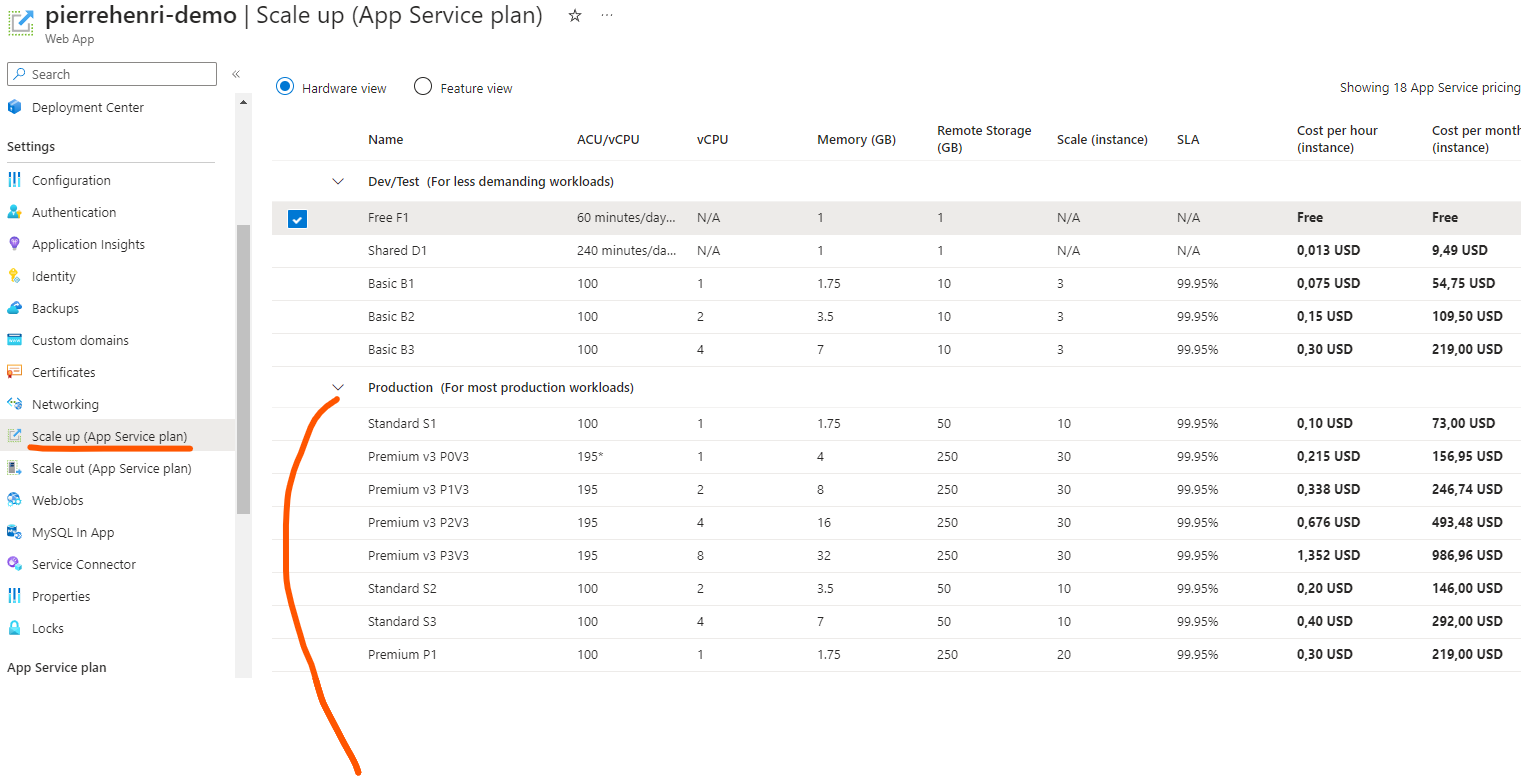
With the free app service plan you have selected for the Demo, it’s a bad choice to go live with a Basic Plan.
DataBase
CosmosDb could be the good choice for your project. If you need to move to SQL Server or Azure Sql Server, you just need to upgrade your plan. Your code is fine with EF Core, just three small things to do : change your nuget package to the right DataBase, update your program.cs and change your connectionString. That’s All !
Code
Nothing, everything is ready !
Azure plans
Here is the place where you will have the most changes to make. And you will have to take out your wallet ! 💰💰💰
Scale Up your plan : choose the plan adapted to your needs. Tips : don’t forget reservations (you can save a lot)
In this article I am not talking about the network and security part. It will be covered in another article.
If you do an international business, I advice you to choose Azure Front Door, otherwise Azure Gateway. It’s expensive but very important to secure your App.
Enjoy 🚀
Commentaires (0)
Aucun commentaire pour le moment. Soyez le premier à commenter !
Laisser un commentaire